
When you’ve exhausted all other options in the celebrating-Thanksgiving-out-of-the-country department (eating out, providing dessert, detailing instructions, offering assistance, going to work dressed like a pilgrim, etc.), you are sometimes forced to take matters into your own hands. And so it was this Thanksgiving, my third in London, when I finally caved and admitted defeat: there was just no way for me to enjoy the holiday without making my own meal, one that featured mashed potatoes and my beloved and aforementioned sweet potatoes with marshmallows and cranberry sauce and stuffing done the right way. The way it would be done were I lucky enough to spend the day in the comfort of my family home, watching the parade and enjoying the day off.
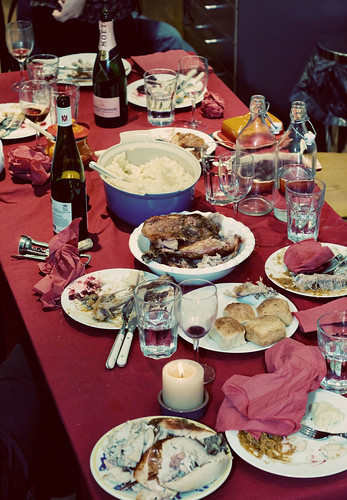
But, despite how daunting this task may be and how time-consuming this holiday inevitably becomes, the employment gods took no pity on me and I spent Thursday at work, frantically checking in on the turkey in the oven, which was being tended to by King H and an American friend just in from Paris (she had the pleasure of walking in to find King H pulling the giblets out of the turkey and spent the remainder of the day standing near the stove with him, taking photos for my future enjoyment) and mapping out all I needed to do before the guests arrived that evening. I don’t often find myself faced with lengthy, regimented, multiple day cooking schedules, but last week was full of them: I sat at work mapping out when I could realistically prepare everything, anything in advance without spoiling the taste or quality of the dish. And, now that the dust has settled and the leftovers have sadly disappeared from the fridge, it’s finally time to pass this new-found wisdom on, or at least record it somewhere so that I know it can been done, it has been done and just maybe it could be done again. Because what I discovered about hosting Thanksgiving, aside from the fact that it’s the only way to really cope with the holiday from afar and that it requires all sorts of schedules and lists, is that it’s worth it all and I’d do it again in a heartbeat. Though, let it be known all ye gods of employment, I still would prefer the day off.
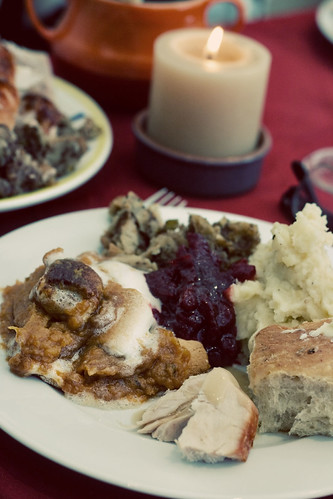
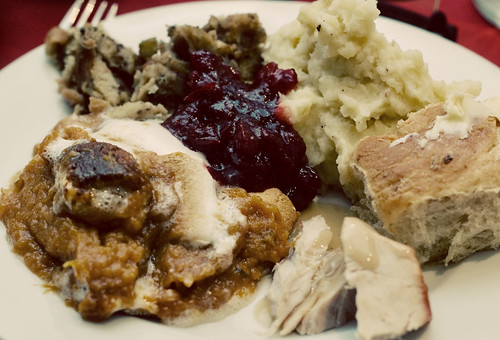
Finally, it wouldn’t be worth mentioning my Thanksgiving this year without highlighting its theme. I love Gourmet magazine. Always have, always will. I can’t possibly explain the joy that I feel when I see that iconic font peering out at me from the cover page, filled with new recipes and stories that will inspire me for the month and beyond. I’m hopeful anyone of a like mind can understand, despite my inability to articulate, and I know I’m not the only one who is mourning its passing. While I know I will always cling to the recipes I have found in the worn-out pages my old copies and on Epicurious, I am also acutely aware that my days of perusing the Gourmet site are sadly numbered. I thought about this long and hard one day while I was seeking out Thanksgiving ideas from a myriad of sources and suddenly felt compelled to spend this holiday exclusively with Ruth and company. It’s both a tribute and an attempt to hang on to something which I know I won’t ever be able to fully hang on to. For now, I’m at least comforted by the fact that my Gourmet Thanksgiving meal was a rousing success and the knowledge that I couldn’t have done it without that familiar friend. Below are all of the recipes I used, along with notes on preparing these in advance and on how I tailored a few things thanks to advice from our moms, who are so much a part of how this holiday tastes to us, and who have been there so many times before (I have a newfound respect for anyone who takes charge of the Thanksgiving meal). Thanksgiving, I’m now more convinced than ever, isn’t as much about where you are than it is about bringing what you most love to the table*.

Hickory-Bacon and Roasted-Corn Gougères
(from Gourmet, November 2007)
I love traditional gougères, but this riff on the classic is a great choice for a Thanksgiving meal. Be mindful, however, of the fact that they taste best warm and should be served immediately when removed from the oven. There’s nothing like hot, melted cheese to tide you over until dinner!
4 hickory-smoked bacon slices (1/4 lb)
3/4 cup corn (from 2 medium ears)
1 cup water
1 stick unsalted butter, cut into tablespoon pieces
1/4 teaspoon salt
1 cup all-purpose flour
4 to 5 large eggs
1 1/2 cups coarsely grated extra-sharp Cheddar (5 oz)
2 tablespoons grated Parmigiano-Reggiano
2 tablespoons finely chopped chives
Preheat oven to 375°F with racks in upper and lower thirds.
Cook bacon in skillet over medium heat, turning occasionally, until crisp. Drain on paper towels, then finely chop.
Pour off fat from skillet, then wipe clean. Add corn and pan-roast over medium heat, stirring occasionally, until kernels are mostly golden brown, 10 to 15 minutes.
Bring water to a boil with butter and salt in a heavy medium saucepan, stirring until butter is melted. Add flour all at once and cook over medium heat, stirring vigorously with a wooden spoon, until mixture pulls away from side of pan, about 2 minutes. Remove from heat and cool slightly, about 3 minutes. Add 4 eggs, 1 at a time, beating well after each addition. (Batter will appear to separate at first but will then become smooth.) Mixture should be glossy and just stiff enough to hold soft peaks and fall softly from a spoon. If batter is too stiff, beat remaining egg in a small bowl and add to batter 1 teaspoon at a time, beating and then testing batter until it reaches proper consistency.
Stir in bacon, corn, cheeses, chives, and 1/2 teaspoon pepper.
Line 2 large baking sheets with parchment paper or lightly butter sheets. Fill a pastry bag fitted with 1/2-inch plain tip with batter and pipe about 35 (3/4-inch-diameter) mounds, or spoon mounded teaspoons, 1/4 inch apart, onto each sheet. Bake, switching position of sheets halfway through baking, until puffed, golden, and crisp, 25 to 30 minutes total. Transfer to a rack (still on parchment if using). Make more puffs on cooled baking sheets. Serve warm or at room temperature.
Yield: about 140 hor d’oeuvres.
Planning ahead: gougères can be made ahead and cooled completely, uncovered, then chilled in sealed bags 2 days or frozen 1 week (I chose to freeze). Reheat, uncovered, on baking sheets in a 350°F oven 10 minutes if chilled or 15 minutes if frozen.


(Dr. T and his surgical skills and the internet provided last-minute carving assistance)
Simple Roast Turkey with Pan Gravy
(adapted from Gourmet, November 2006 and Gourmet, November 2008 and inspired by our moms)
Time now for the centerpiece of any Thanksgiving meal, a mark of distinction which left both King H and I, neither of whom had ever roasted a turkey, feeling a bit overwhelmed. I’ve always been more comfortable in the baking department and am not ashamed to admit that I’ve only started cooking whole chickens over the past year (predominantly to make King H his mother’s beloved chicken and dumplings recipe, but I’m now finding myself obsessed with having chicken stock around the house). A turkey felt like…a whole new beast, especially for a girl who has a pretty ridiculous meat-to-carbs ratio on her plate every Thanksgiving. And one that needed to be tended to while I was away from home. As he did with the yeast rolls described below, King H took charge, lugging the turkey home, de-frosting it for a few days and then baking it over the course of the day on Thursday, all while managing to entertain our just-arrived houseguest and her camera (my life was enriched by the photos she took of him massaging the turkey, even when she wasn’t trying to). I had settled on this turkey recipe because it was assured to be great for first-timers, with no bells and whistles. And, to be honest, I simplified it even more at the 11th hour when I realized I just wouldn’t have the time to prepare the turkey stock in advance, settling instead on chicken stock for both the turkey and the stuffing (next year, next year, I continue to tell myself, so as not to feel a failure…one step at a time). I can now assure you the chicken stock is a fine replacement when there isn’t enough time to get up close and personal with the giblets. When it came down to it, though, it was once again our mothers who provided the most critical advice, and where and why we veered somewhat from the recipe. First, he washed and stuffed the bird with plenty of salt (more on this method and the rationale behind it can be found below), coated it with butter (making sure to lodge wedges of butter between the skin and bones, as my mother recommended he do. And then…well, I won’t soon forget King H’s frantic calls to me after he placed the bird in the oven and realized the recipe called for the heat to be 450°F , when his mother had just told him (called to the phone at 6am her time, mind you) it should be at 350°F. One call to my mother later and he had the solution: it was fine for him to keep the temperature higher for the first hour or so, but he’d bring it down after that, to let it roast a bit slower over the course of the day, the way both of our mothers’ do. 4 hours later he was pulling our very first turkey out of the oven, while I nearly cried with relief at the smell and sight of it. I wasn’t home, but at that moment I could have closed my eyes and never known the difference.
1 16-lb turkey at room temperature 1 hour, any feathers and quills removed with tweezers or needlenose pliers, and neck and giblets removed and reserved for another use if desired
2-3 tablespoons salt
1 3/4 teaspoons black pepper
2 cups water or turkey/chicken stock
For the turkey:
Put oven rack in lowest position and preheat oven to 450°F. Rinse turkey inside and out, then pat dry. Sprinkle turkey cavities and skin with salt and pepper. A generous amount of salt should go inside the turkey itself – according to my mother, my grandpa, a butcher and a meat inspector for his entire life, used to sear by this method and ensured it would keep the turkey bacteria-free and allow anyone to keep the stuffing inside the bird. The trick is to omit salt from whatever stuffing recipe you are using entirely in order to compensate for all that extra salt in the cavity.
Put turkey on rack in roasting pan. Add 2 cups water or stock to pan and roast for one hour without basting. The lower temperature to 350°F and roast, basting every so often, until thermometer inserted into fleshy part of thighs (test both thighs; do not touch bones) registers 170°F, 3-4 hours.
Carefully tilt turkey so any juices from inside large cavity run into roasting pan, then transfer turkey to a platter, reserving juices in roasting pan. Let turkey stand, uncovered, 30 minutes (temperature of thigh meat will rise to 180°F).
For the gravy:
2 cups hot turkey or chicken stock
1/3 cup all-purpose flour
Melted unsalted butter if necessary
Reserved chopped giblets from stock (optional)
Strain pan juices through a fine-mesh sieve into 2-quart measure and skim off fat (or use a fat separator), reserving fat. Pour pan juices into a bowl and add stock.
Whisk together flour and 1/3 cup reserved fat (if there is less, add melted butter) in a heavy medium saucepan, then cook over medium heat, whisking constantly, 2 minutes (mixture will be thick). Add pan juices and stock in a fast stream, whisking constantly to prevent lumps, then bring to a boil, whisking. Stir in any turkey juices from platter. Chop and add giblets (if using). Simmer gravy, whisking occasionally, 3 minutes. Season with salt and pepper.
Yield: 12 servings (with leftovers!).
Planning ahead: sadly, there is none. You’ve got to wing it (pardon the pun). But, in case you wanted more guidance from the man himself, here’s a brief, but harrowing re-telling from King H himself that should perfectly sum up his afternoon: “As for the turkey, I started off using the recipe. I then of course got worried because I saw another recipe that called for 325 degrees, and the bag on the turkey said the same. That is when I freaked out. I wrote you to ask your opinion and you said to call the moms, which I did. I asked them both about cooking it and they both said they do it at 325-350 and that you could cook it higher to get a more crispy outside. So, for the first hour or so I did cook it at the higher temperature and then lowered it to 325. Once it was on 325, I set the timer for every 20 minutes and would baste it. I don’t know if that is the right thing to do or what Ruth Reichl would think of me, but I figured that sounded like a good amount of time. As for the prep, I cleaned it thoroughly like 12 times, then buttered it as you said and stuffed it with butter. Is there anything else you need to know, love?” Thanks, King, H – I think that should do the trick.

Spiced Cranberry Sauce
(from Gourmet, November 1991)
This is not your (or at least my) mother’s cranberry sauce – the cloves and cinnamon give it a much-welcomed spicy kick to counter the sweetness of the traditional dish.
a 12-ounce bag of cranberries, picked over
1/2 cup honey
2 to 3 tablespoons firmly packed brown sugar, or to taste
two 3-inch cinnamon sticks
6 whole cloves
1/4 teaspoon freshly grated nutmeg, or to taste
3/4 cup water
In a saucepan combine the cranberries, the honey, the brown sugar, the cinnamon sticks, the cloves, the nutmeg, and the water and simmer the mixture, covered, stirring occasionally, for 5 to 10 minutes, or until the cranberries have burst and the mixture is thickened. Transfer the sauce to a bowl and let it cool. The sauce may be made 2 days in advance and kept covered and chilled. Serve the sauce at room temperature.
Yield: about 2 1/4 cups.
Planning ahead: I made this recipe exactly as suggested, but put it all together on Tuesday night. Not only did it last perfectly until Thanksgiving, but it has become my new favourite cranberry sauce recipe. It may not taste exactly like home, but the spices are so intoxicating and add such a beautiful tartness to the otherwise sweet side dish, that it’s practically perfect in every way.

Brown Butter and Scallion Mashed Potatoes
(adapted from Gourmet, November 2005)
I must admit: I omitted the scallions. King H and I had a long discussion and he simply felt that the addition of sour cream and brown butter would n these enough from the ones that we both grew up with and that we shouldn’t overdo it (we were going for the most classic meal possible, given we were introducing so many people to the holiday for the first time). I have to say, I didn’t even miss the scallions, though I can’t wait to try these again with them included. The brown butter was once again LINK a hit – people never tire of smelling it and ogling over the nuttiness of it. They were simply outstanding, and I’m proud to say I even instructed my mother to add sour cream and brown butter to her traditional recipe and it was met with just as much success at her meal. Thanks to Gourmet, we created new traditions left and right this year!
5 lb yellow-fleshed potatoes such as Yukon Gold, peeled and cut into 1-inch pieces
1 tablespoon salt
1 cup whole milk
1/2 cup sour cream
1 1/2 sticks (3/4 cup) unsalted butter
2 bunches scallions, cut crosswise into 1/2-inch pieces
1/2 teaspoon black pepper
Cover potatoes with cold water by 2 inches in a 5- to 6-quart heavy pot and add 1 1/2 teaspoons salt. Bring to a boil, then reduce heat and simmer, uncovered, until potatoes are tender, 10 to 15 minutes.
Drain potatoes in a colander, then return to pot and cook over moderate heat, shaking pot occasionally, until dry, 1 to 2 minutes. Mash hot potatoes with masher or force through food mill into another pot, then cover to keep warm.
Bring milk with remaining 1 1/2 teaspoons salt just to a boil in a 1-quart saucepan, then remove from heat and stir into potatoes until combined. Stir in sour cream, then cover and keep warm.
Cook butter in a 12-inch heavy skillet over moderately high heat, stirring frequently and scraping up brown bits, until foam subsides and butter is golden brown, about 8 minutes. Add scallions and pepper and cook, stirring, until slightly softened, about 2 minutes. Fold butter mixture into mashed potatoes and season with salt.
Yield: 8 to 10, with plenty of leftovers.
Planning ahead: Mashed potatoes can be made 1 day ahead and cooled, uncovered, then chilled, covered. (Scallions may discolor slightly when potatoes are made ahead.) Reheat in a microwave or in a heavy pot over moderate heat, stirring. Upon the advice of my mom, however, I made them the day of, right before dinner, although I chopped the potatoes the night before and left them in a pot of cold water to prevent discoloring. She insists mashed potatoes are best fresh and, upon tasting these, I’m inclined to agree with her.

Sage Stuffing
(adapted from Gourmet, November 2008)
This stuffing smelled like home. It was exactly what I needed after 2 years of English stuffing that wasn’t stuffing at my Thanksgiving table. I was a little hesitant to use a fresh baguette, as I know my mother uses pre-dried/cut pieces, but as soon as this came out of the oven I could tell from the smell that all would be well. As a few commentors on Epicurious did, I added about a tablespoon of thyme to this recipe and would highly recommend it. As mentioned above, I also omitted the salt, as the inside of the turkey was heavily salted prior to King H’s placing the stuffing inside.
1 medium onion, coarsely chopped
2 celery ribs, coarsely chopped
7 tablespoons unsalted butter, divided
1 good-quality baguette (1/2 lb), cut into 1-inch cubes (8 cups)
1/3 cup chopped celery leaves
1 1/2 tablespoons chopped sage
1 tablespoon thyme (optional)
1 cup turkey stock or reduced-sodium chicken broth (plus more for re-moistening if not cooking immediately)
1 large egg
Preheat oven to 400°F with rack in lower third (or prepare oven according to turkey’s instruction, if placing stuffing inside bird). Butter a 1 1/2-quart shallow baking dish or gratin dish if baking separately.
Cook onion and celery in 6 tablespoons butter with 1/2 teaspoon salt and 1/4 teaspoon pepper in a large heavy skillet over medium heat, stirring occasionally, until softened, 8 to 10 minutes. Transfer to a bowl and toss with bread cubes, celery leaves, thyme (if using) and sage, then cool 5 minutes. Whisk together stock and egg (if stock is hot, gradually whisk into egg), then toss with bread mixture until absorbed. Transfer to baking dish or stuff inside 14-16 pound turkey and dot top with remaining tablespoon butter.
If in baking dish, bake, covered with foil, 30 minutes, then uncover and bake until top is golden, about 10 minutes more. If inside turkey, bake until turkey is ready for serving and is at least 170 degrees Fahrenheit.
Yield: 6. While most of the other recipes (particularly the mashed potatoes) served more than the suggested serving size, I would definitely double the stuffing recipe next time (though it may be hard to fit it all in the bird!). It was the first leftover to run out and the one I missed the most!
Planning ahead: stuffing can be assembled (but not baked) 1 day ahead and chilled (covered once cool). Bring to room temperature before baking, add more stock to moisten and bake or stuff inside turkey. This method worked perfectly for us.

Brown Sugar-Glazed Sweet Potatoes with Marshmallows
(adapted generously from Bon Appétit, November 1994)
Time for my second admission: I cheated. Ruth, please don’t hate me, but I couldn’t for the life of me find a classic candied yams with marshmallows recipe from Gourmet. It must be the one and only recipe they’re missing! But, what an important recipe it was. As I mentioned previously, this was the dish we had touted to all of our foreign friends, and they came to dinner prepared to hate it, despite all our assurances. And so it was even more critical that this recipe be everything I’d ever dreamed about in mashed sweet potatoes topped with marshmallows (and yes, I have dreamed about them many times over the past few years). In the end, although I used this recipe for guidance, I again found myself on the phone with my mother, who made suggestions and helped me create the dish I remembered from my childhood (this recipe originally called for nutmeg and cinnamon, for instance, but my mother said those additions end up making the dish taste more like pumpkin pie and less like the brown sugary sweet helpings I devoured in the past – of course, if you like pumpkin pie spice with your sweet potatoes, feel free to add the other spices). The one that would, and did, wow and convert even the most ardent skeptics (T, I’m looking at you). Then again, it may have helped that I overdid it so much on the marshmallows that they practically poured out of the pan (I don’t know how, but my mother clearly has more restraint), but that’s no matter in the end. It was the satisfied and smiling faces that made this dish.
4 pounds red-skinned sweet potatoes (yams), peeled, cut into 1-inch pieces
1 cup packed golden brown sugar (plus a bit more to sprinkle on top)
6 tablespoons butter
1 bag marshmallows or miniature marshmallows (feel free to strike out on your own here, just ensure that when they melt the potatoes will be nicely covered – my imported marshmallows came in small bags, but I recall watching my mother wing it and dump handfuls of mallows from a bag of Kraft jet-puffed marshmallows on top of the potatoes. How I miss the wonder of jet-puffed mallows.)
Preheat oven to 375°F. Cook potatoes in a pot of cold, salted water until boiling, then simmer until tender (about 15 minutes). Mash potatoes with a hand masher. Mix in 1 cup of brown sugar and butter until butter has melted and brown sugar is completely incorporated. Arrange potatoes in 13 x 9 x 2-inch baking dish. Bake potatoes 20-30 minutes or until heated throughout. Top potatoes with marshmallows and return to over for 10 minutes or until marshmallows melt and begin to brown.
Yield: 8 (or more, if you overdo it on the mallows like someone I know).
Planning ahead: Unlike the mashed potatoes, I did make the sweet potatoes on Wednesday, both for my sanity and for the fact that they would be re-heated in the oven in any case. I cooked and mashed the potatoes on Wednesday, mixed in the brown sugar and butter and left the potatoes in the baking dish, covered with foil, until dinner was nearly ready on Thursday. I then heated the potatoes and added marshmallows, giving myself enough time to ensure the potatoes would be hot/melted when served.

Featherlight Yeast Rolls
(from Gourmet, January 2008)
I found myself caught between a rock and a hard place at 1 am Wednesday night, when I finally admitted to myself that I couldn’t conceivably wake up at 6am and prepare these rolls before heading to work. King H, who introduced me to dinner rolls, having been served them homemade by his mother since childhood, was more than willing to assist (just one of the many things I was thankful for this year). He informed me he woke around 8 and prepared the dough, only to realize we had run out of flour! One frantic visit to the grocery store later (and about the same time our friend popped off the Eurostar) and he was back in the kitchen assembling a new batch. When I arrived home I removed the dough from the fridge and set to assembling and baking them. I can now concur that these are, indeed, “so light and fluffy they almost levitate”, although I must admit I prefer my usual recipe, despite the fact that levitating rolls could provide quite the dinnertime entertainment. One piece of advice: I would stray from the instructions and dot the rolls with butter after they’ve baked. Then the rolls remain moist and light, as opposed to a bit drier and crustier than my typical recipe.
1 russet (baking) potato (1/2 lb), peeled and cut into 1-inch pieces
1/2 stick unsalted butter, divided
1/2 cup whole milk
1 teaspoon salt
2 tablespoons sugar
1 (1/4-oz) package active dry yeast
2 2/3 cups all-purpose flour
Generously cover potato with cold water in a medium saucepan. Bring to a boil, then simmer, covered, until very tender, about 10 minutes. Reserve 1 cup cooking liquid, then drain potato well.
Meanwhile, melt 2 1/2 tablespoons butter.
Mash hot potato in a large bowl with a fork. Stir in milk, salt, 2 tablespoons sugar, and 2 tablespoons melted butter (mixture will be lumpy).
Cool 1/2 cup cooking liquid to warm (105 to 115°F ). Stir in yeast and let stand until foamy, about 5 minutes. (If mixture doesn’t foam, start over with new yeast and remaining cooking liquid.)
Stir yeast mixture into potato mixture, then stir in flour with a wooden spoon until a soft dough forms.
Turn out dough onto a floured surface and knead, dusting surface and hands with just enough flour to keep dough from sticking, until smooth and elastic, about 10 minutes (dough will be slightly sticky).
Brush a large bowl with some of remaining melted butter, then turn dough in bowl to coat. Cover tightly with plastic wrap and let rise, chilled, 8 to 12 hours.
Punch down dough (do not knead), then halve. Roll each half into a 12-inch-long log on a very lightly floured surface with lightly floured hands. Cut each log into 12 equal pieces and roll each into a ball.
Arrange evenly spaced in 6 rows of 4 (less than 1/2 inch apart) in a buttered 13- by 9- by 2-inch baking pan.
Cover pan with a kitchen towel (not terry cloth).
Let rolls rise in a draft-free place at warm room temperature until doubled (they will fill pan), 1 to 1 1/2 hours.
Preheat oven to 375°F with rack in middle.
Melt remaining 1 1/2 tablespoons butter.
Brush top of rolls with melted butter and bake until golden-brown, 25 to 30 minutes. Loosen edges with a sharp knife, then transfer rolls to a rack and cool slightly.
Yield: 24 rolls.
Planning ahead: Rolls are best the day they’re baked but can be frozen, wrapped well, up to 1 month. Thaw, then reheat, uncovered, on a baking sheet in a 350°F oven, 5 to 10 minutes. I opted to go fresh, but the rolls could be made earlier in the day and gently reheated. I found, however, that since this particular recipe calls for an 8 hour rest period, it’s easy to make them in the morning and then shape them before your guests arrive, letting them rise until hor d’ourves have been served and then heating them in the over until dinner.

Pumpkin Pie
(from Gourmet, November 1999)
A classic pumpkin pie recipe to win over even the most skeptical Europeans, albeit a much lighter version than the one on the back of the Libby’s can. Making both of these pies (using the same crust recipe below) taught me another important holiday lesson: as much as you may love and trust your now defunct cooking magazine, always do what has worked for you in the past, particularly when it’s something your mother taught you. I always, always put foil around my pie crusts to keep them from burning (particularly in England, where my oven is volatile at best), but, considering I wanted to follow Gourmet religiously, I omitted this step. An hour later, I was hitting myself for it and apologizing to my mother repeatedly for discarding her method while at the same time sending her photos of the results to get her opinion. She talked me off the ledge, assured me the tiny leaves I’d painstakingly crafted for the pumpkin pie were not for naught and suggested I put whipped cream about the pecan pie edges when I served it and no one would ever know the difference. Thankfully, she was proved right (birthday candles for B helped matters) and I will never be baking pies without foil. Again.
For the dough:
3/4 stick cold unsalted butter
1 1/4 cups all-purpose flour
2 tablespoons cold vegetable shortening
1/4 teaspoon salt
2 to 4 tablespoons ice water
Cut butter into 1/2-inch cubes.
To blend by hand:
Blend together flour, butter, shortening, and salt in a bowl with your fingertips or a pastry blender until most of mixture resembles coarse meal, with rest in small (roughly pea-size) lumps. Drizzle 2 tablespoons ice water evenly over and gently stir with a fork until incorporated.
To blend in a food processor:
Pulse together flour, butter, shortening, and salt in a food processor until most of mixture resembles coarse meal, with rest in small (roughly pea-size) lumps. Add 2 tablespoons ice water and pulse 2 or 3 times, or just until incorporated.
Test mixture:
Gently squeeze a small handful: It should hold together without crumbling apart. If it doesn’t, add more ice water, 1 tablespoon at a time, stirring or pulsing 2 or 3 times after each addition until incorporated (keep testing). (If you overwork mixture or add too much water, pastry will be tough.)
Form dough:
Turn out onto a work surface and divide into 4 portions. With heel of your hand, smear each portion once in a forward motion to help distribute fat. Gather dough together and form it, rotating it on work surface, into a disk. Chill, wrapped in plastic wrap, until firm, at least 1 hour.
Yield: one single-crust 9-inch pie or a 10- to 11-inch tart.
For the pie:
15-oz can canned solid-pack pumpkin (about 2 cups)
1 cup heavy cream
1/2 cup whole milk
2 large eggs
3/4 cup packed light brown sugar
1 teaspoon ground cinnamon
1 teaspoon ground ginger
Pinch of ground cloves
1/4 teaspoon salt
Make pastry dough as directed above. Roll out dough into a 14-inch round on a lightly floured surface and fit into a 9-inch glass pie plate (4-cup capacity). Crimp edge decoratively and prick bottom all over. Chill until firm (30 minutes in the refrigerator or 10 minutes in the freezer).
Preheat oven to 375°F.
Line shell with foil and fill with pie weights. Bake in middle of oven 20 minutes. Remove weights and foil and bake shell until pale golden, 6 to 10 minutes more. Cool in pan on a rack. Whisk together pumpkin, cream, milk, eggs, brown sugar, spices, and salt, then pour into shell.
Bake pie in middle of oven 45 to 50 minutes, or until filling is set but center still trembles slightly. (Filling will continue to set as pie cools.) Transfer to rack and cool completely.
Yield: 8 servings.
Planning ahead: the recipe suggests this pie and the crust can be made 1 day ahead and chilled, covered, but crust will not be as crisp as if made day of serving. I went ahead and made the crusts for both this and the pecan pie on Tuesday and made both pies on Wednesday and fortunately couldn’t taste a difference the next day.

Old-Fashioned Pecan Pie
(from Gourmet, November 2009)
The classic pecan pie recipe you’d expect to find somewhere down South (or at least a place where Karo Corn Syrup is readily available). A nice bonus to this recipe is that the pecan halves rise beautifully to the top, unlike many recipes I’ve used in the past which call for the pecans to be chopped.
Pastry dough (see recipe above)
3/4 stick unsalted butter
1 1/4 cups packed light brown sugar
3/4 cup light corn syrup
2 teaspoon pure vanilla extract
1/2 teaspoon grated orange zest
1/4 teaspoon salt
3 large eggs
2 cups pecan halves (1/2 pound)
Preheat oven to 350°F with a baking sheet on middle rack.
Roll out dough on a lightly floured surface with a lightly floured rolling pin into a 12-inch round and fit into a 9-inch pie plate. Trim edge, leaving a 1/2-inch overhang. Fold overhang under and lightly press against rim of pie plate, then crimp decoratively. Lightly prick bottom all over with a fork. Chill until firm, at least 30 minutes (or freeze 10 minutes).
Meanwhile, melt butter in a small heavy saucepan over medium heat. Add brown sugar, whisking until smooth. Remove from heat and whisk in corn syrup, vanilla, zest, and salt. Lightly beat eggs in a medium bowl, then whisk in corn syrup mixture.
Put pecans in pie shell and pour corn syrup mixture evenly over them. Bake on hot baking sheet until filling is set, 50 minutes to 1 hour. Cool completely. Serve with whipped cream or ice cream (the nutmeg ice cream recipe below was perfect with both this and the pecan pie).
Yield: 8 servings.
Planning ahead: pie can be baked 1 day ahead and chilled. Bring to room temperature before serving. As mentioned, I made both pie crusts on Tuesday and baked this on Wednesday. Per my mother’s astute advice, I kept the pie uncovered in the fridge, to help avoid the condensation that so often ends up on the top of a pumpkin pie that’s been in the fridge. I removed the pie from the fridge about 2 hours before serving (as I was readying dinner) and it was at room temperature by the time I served it for dessert.

Nutmeg Ice Cream
(from Gourmet, November 1990)
The idea to make ice cream came to me as soon as I started contemplating this daunting meal and what I could possibly make in advance. Ice cream was the perfect dessert choice, because I knew my time machine (read: the freezer) could handle a batch well before Thanksgiving and that I wouldn’t risk losing any flavour. Ice cream was made for the freezer and this recipe was made for Thanksgiving. It was creamy and custardy, just like the best ice creams should be, and yet it was incredibly simple to make. The taste of the nutmeg mixed wonderfully well with both the pumpkin pie and the pecan pie. I will be making this every Thanksgiving if I have my way. I may even add some chunks of chocolate to it or steep some cloves with the cream for a nice fall kick. The Stone Cold wanna-be in me can even see crumbling some cooked pie crust and a bit of pumpkin puree in there and calling this Pumpkin Pie Ice Cream. Because any way you chose to serve it, this recipe is a winner.
1 1/2 cups milk
1 1/2 cups heavy cream
3 large eggs
3/4 cup sugar
1 teaspoon freshly grated nutmeg
1/8 teaspoon salt
1/4 teaspoon vanilla
In a saucepan bring the milk and the cream just to a boil. In a bowl whisk together the eggs, the sugar, the nutmeg, the salt, and the vanilla, whisk 1/2 cup of the milk mixture into the egg mixture, and whisk the mixture into the remaining milk mixture. Cook the custard over moderate heat, stirring constantly with a wooden spatula, until it registers 175°F on a candy thermometer. Transfer the custard to a metal bowl set in a larger bowl of ice and cold water and stir it until it is cold. Freeze the custard in an ice-cream freezer according to the manufacturer’s instructions.
Yield: 1 quart.
Planning ahead: yes! I made this on Monday, but it can easily be made even further in advance. I would advise removing it from the freezer at least 15 minutes before dessert, however, that way it isn’t rock solid (I don’t know about you, but I prefer my ice cream a bit on the mushier side). I also use an ice cream scoop when I transfer the ice cream from the ice-cream maker to the freezer, which then makes it easier to dish out scoops at will. If you’re not eating it all at once by yourself, of course…
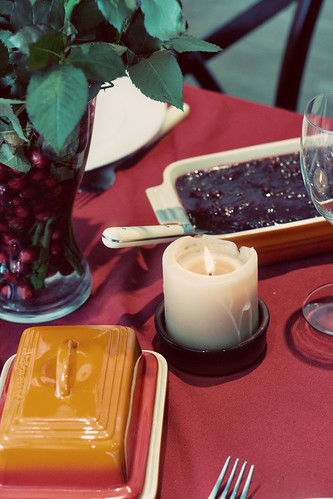
*And, speaking of the table, a great idea from Martha Stewart, was the perfect complement to the piles of food we left in our wake.
Read Full Post »


